Colour and design (Card making).

text placeholder-3

I’m sure by now you will see a trend with my creative habits, I like working with a certain colour pallete and I tend to start out with one idea and just develop it as I create.  My aim today was to create some masculine cards so I went with navy and white for this first lot of cards.

Navy and white is such a classic combination that I love in most areas, especially in my home decor.  I find it easy to create cards when I’m just using a simple combination.

Rooted in Nature is such a versatile set and I went on to expand my designs using sahara sand card stock. I think that these are great designs for both men and women.

linda l desgns

Rooted in nature allows you so many options especially for designer backgrounds.  I will show a few of my other designs below.  With the next group of cards I thought I would go for colour and I hope I have shown you how versatile one stamp set can be.

linda l designs-26

Next I couldn’t help but get some pink…if you are ever stuck for a colour combo just add pink to the mix and you will never look back!


linda l designs-27

What do you think? I love the pink and sahara sand combination. Next week I will show you some other interesting colour combinations that really work.


Hope you enjoy!

Much love

Linda L x


Flowering Desert.

53030610_327880131192637_5542820054728441856_n


I really wanted this stamp set, its so on trend at the moment and I just knew I could  make some beautiful cards with the Flowering Desert stamp set.  As you can see I have a few decorative items in my studio that are cacti….so cute!

Inspiration came quickly with this set as I couldn’t wait to play.

Pool Party Ink

Pool party card stock

Mint Macaron card stock


148700G

There are so many options with this stamp set, you can make amazing backgrounds with some of these gorgeous designs. I absolutely love creating my own designer papers for my backgrounds…and Stampin’ Up make this so easy to achieve!

52976959_1075904382607913_5049864667933966336_n

I just think the above card is simple to put together and yet super elegant, this classic colour combination will suit so many occasions.  I used the subtles card stock for all of these cards.

Whisper white

Subtles card stock

Basic grey Ink

Petal Pink

52607812_442920586249826_8148121343599050752_n

Same colours just using a different foliage both the large and small of these stamps combined together make a super design! So its just so easy with Stampin’Up products, choose your stamp set, then your papers and then your co-ordinating inks.

52973968_346238342651967_4837934518939680768_n

Black and Lemon Lime twist , what a pop of brightness…this will brighten someones day!

Your designs are only limited by you, so expand your creativity the simple way using Stampin’ Up products and make big colour choices and know that having inks, pens and papers that all co-ordinate will make your projects stand out from the crowd.

I would love for you to join my team or for you to become one of my valued customers. When you place an order with me you will always get a little gift!

Have a wonderfully creative day,

all my love

Linda L x


Hello Cupcake – CTC216

Cupcake 1


Welcome to this week’s CASEing the Catty. This week we are CASEing the Sale-A-Bration catalogue and I couldn’t go past the Hello Cupcake stamp set.  This set is free when you spend $90 or more and is a very versatile stamp set.

I created simple watercolour backgrounds using Stampin’ Up Water colour paper, such great quality paper! I love it! I also used the subtles range to help keep my design co ordinated. The circle and square frameits helped tie it all together.

52935786_2292063421040931_3264420709715148800_n

This one I created my own designer paper using the small hearts and flower stamps included in the set.  This can always give a truly personal touch to your cards!

Fabulous set and I plan to do much more with this set so check in next week to see just how versatile this set can be, and its free with any purchase over $90… please head over to my shop and check out our wonderful products.

Have a wonderful day,

Much love Linda L x

Simply with love…

linda l designs-17


This is a simple way to use old stamp sets in new ways.  Sometimes we don’t need or want to go out and buy new stamps.  I believe in getting the most use you possibly can from what you have on your shelves.  So for me when the #simplestamping challenge came up,  I  looked at what I had  available and created this little card.  I’m so pleased with the end result and its a perfect valentines card and super cute too!


Then I realised that many of you wont have this set so I took a current set and created another simple card :

linda l designs-19

“You sure know how to make someone happy” is on the front – “my little honey bee” (could easily be put inside the card)! There you have it,  a valentines card in a very untraditional way.  This card has a little wink of stella over each bumble- bee and looks rather fetching as the light catches each bee.  These are easy projects to try at home.

You will need:

Whisper white card

Black memento ink

Dragonfly Dreams stamp set

Wink of Stella


What makes something simple? Really its just going back to basics and in card making that means stamps on card and using the most basic of equipment, scissors, card, ink and adhesive.  Its a great way to get started in a creative pursuit of card making and designing. Here are some others I’ve created using  current stamp sets:


linda l designs-23

Something like this would be a fabulous starter for a friend or relative:

Calypso Coral classic stamp pad

Calypso Coral stampin blends

Make a difference stamp set

2″ circle punch

Lemon Lime Twist classic stamp pad

Lemon Lime Twist card stock

Whisper White Card stock


Text placeholder-2.png

I love a blue and white design on anything! So here is a simple elegant card anyone can recreate. Its easy and beautiful…


I hope you enjoyed this post.

Please feel free to buy from my store , if you purchase from my store you will get a gift from myself and a catalogue sent right to your door.

Happy stamping!

Much love Linda L x


Plan your week.

This weeks planning page is all about you. Organising your life around what you have to do and what you would like to do….I’m now meal prepping and taking stock of my daily routine for the next month or so… trying to get as much from my day as I can. Taking notes and observing my day will help me get a good overview of where I need to improve in my life! Plan with me each week and don’t forget to like this page to be in the draw for a new planner!

49617553_346922022558348_3526343105508802560_n

Daily observations are my new thing, helping me plan more productive days that allow me more time to do what I love!

Want the planner! Click here to purchase one today!

Much love

Linda L x

simple stamping

Keep it simple!  We have all heard that before and let me tell you that in all areas of design…simple just works!  That doesn’t mean that all design should be simple but keeping things simple can really keep a project on track.  Knowing when enough is enough can be a tough place to be and by planning a simple project in the beginning …can save you a whole lot of card stock later on.

linda l designs-6

How to keep it simple:

Choose you stamp set

Choose 3 colours and (white or black)

To give dimension use several mounts, as above I used a frame of blushing bride then whisper white and propped it all onto a blushing bride background using dimensionals, then onto whisper white card base.

The bow was in my stash of stamped extras that I keep at hand but quite easily you could just use something from the same stamp set …to keep it simple! You can see this with the card pictured below.

linda-l-designs-7.png

To make this project you will need:

Wink of stella glitter brush

Tranquil Tulips

Blushing Bride cardstock

Whisper white cardstock

Inks used:

Balmy Blue

Blushing Bride

Lemon Lime Twist

STAMPIN’ DIMENSIONALS

Another simple technique added to this card was my wink of stella, which I added over the base of the flower petals, this gives a lovely sparkly glow!

Hope you enjoyed this post and try your hand at simple stamping, lots of fun and remember….Keep it Simple! You cant go wrong.

Want to join my team click here or email me for more information!

Linda L x


Simple Stampin’

Stamping should be fun and certainly when you first start out should be easy!  Over the next few weeks I will be posting some simple stamping ideas.  Simple cards that are quick and easy but still look simply gorgeous.

All you will need is paper, glue, ink and stamps.  My tip to make simple stamping look super professional is mounting onto several layers of card stock in co-ordinating colours.
49949563_347482105841843_8620764597395128320_n48395728_589391698190610_4308175471486435328_n

For this project I used four colours, with  basic whisper white

Stock card used:

Lemon Lime Twist

Powder Pink

Inks I used were:

Powder Pink

Lemon Lime twist

Pool Party

Pacific Point

Stamp set “Beautiful Peacock” is retired but any 2 or three set stamp set will do!


simple stamping1

Check out my video below that shows how quick and easy this project can be!

Have a wonderful day, feel free to contact me for any further information or if you would like to join my team.

Much Love

Linda L x


Breathe…the big move!

If you have been wondering what I have been up to for the last three months, we have been organising a big move!  My husband and I made a decision to move to another state, from Western Australia to Tasmania. Yes, its been epic, with lots of fun and a few tears. Leaving our children and granddaughter back home in WA was difficult and I try to talk to them most days, of course they are planning to visit.

As for me personally,  so far its been a fabulous experience and I’m getting ready to start my crafting and painting as a full time career.  If the cat will get off my desk!

48386363_350892668794722_3201683886199275520_n-e1544678397803.jpg

The packing was great and very quick as we had people to do all the work …but the unpacking has not been so magical…I cant find anything and yet I’m finding things I didn’t know I still had!  The joys of a move, we are waiting on our cars to arrive so I’m house bound, which has been a blessing as I have no choice but to unpack, sort and organise (and create). More creating than organising!

We flew the dog and cat over a few weeks after us so we could have a look around the island.  Its been an interesting week since the pets have arrived. Miss Molly is still a little traumatised from the entire flight experience and giving us the cold shoulder, except at walk time (she perks up then!). The cat who is 19 has taken it in her stride but is choosing weird and inconvenient places to set herself down. The main thing is they are here with us now and helping to create the feeling of home.

47686740_1132965213547707_570007430797197312_n

48407228_2226269587697523_6621108299179753472_n

I have to say that Tasmania is really beautiful, lovely green fields, trees, historic buildings and beautiful turquoise oceans.  Some parts seem rugged and untamed whilst other are so precise and almost planned out that the contrasts are truly exceptional.  A small state, we have already travelled from one side to the other, but we plan to see it all and everything in between!

48358715_497642284058053_9107163016532590592_n.jpg

Our gorgeous cottage is a historic home in town and very comfortable with fire places, quirky windows, tin sheds scattered around our massive yard and a big veranda around the home! Exactly what I had put on my vision board a year earlier! It even has a red door.

48078884_501527620335464_3415149103749791744_n

This is a little snippet of my life, I have lots of crafty projects planned and hope to share these with you.

If you would like to join my team please click here.

If you would like to buy products from me please click here.


Magical Mermaid.

I absolutely love this stamp set Magical Mermaid and when combined with the Artisan Textures set it works beautifully. I created these two cards last night, simple and fun! I decided that my mermaids tale would be multicoloured but any combination looks fab, even one colour looks beautiful. I also coated her with “wink of Stella” just to give that magical effect.

36035066_10212314988135633_6616738350344699904_n-2

I used two of the Artisian Texture stamps to create this look…

36176706_10212315108538643_6694022825092579328_n

I also used some cool embellishments on these projects check out the list below to create these cards yourself:

Whisper White A4 Cardstock

Rhinestone Basic Jewels

Pool Party Classic Stampin’ Pad

Night Of Navy A4 Cardstock

Night Of Navy Classic Stampin’ Pad

2″ (5.1 Cm) Circle Punch

Many Marvelous Markers

36114298_10212314989855676_5072181730320842752_n-2

Latte…Art?

I had planned to make an art journal with a delightful coffee cup that had inspired me a few weeks ago. I finally tackled the challenge this weekend and initially was a little stumped as to how to begin, this sometimes happens when I don’t strike immediately when inspired. But of course, just when you think you have lost inspiration something turns up, I had a book on my desk that I had been reading on and off for the past month. I flipped it open and this was the quote that I opened on. I immediately photocopied the quote and knew that this was perfect for this project.

Art journal 2_quote

A cup of coffee and freedom? Mmmm… yes  I feel a certain amount of relief and time to reflect on my day when I stop for a coffee…so why not spend that time focusing on all the areas of my life that are blissfully and freely mine, like this one right now, or when I spend an hour being creative or even just taking a break for a cup of coffee!

Below is a step by step set of fairly self-explanatory photos outlining how I created this layout. Colour inspiration came directly from the paper cup.

29496172_10211714840292312_8757465203039272960_o.jpg


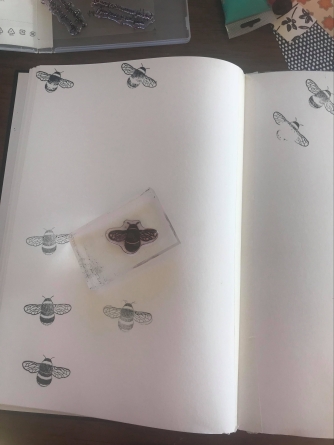
I started out by stamping out the pages using Dragonfly Dreams photopolymer stamp set.  This is a gorgeous stamp set that I have personally used in many projects.

I continued to create a busy background knowing that only some of this will peek through by the time I have finished.

Then it was time for the paint. When I’m art journalling I always put my first layer of paint directly from the tube to my paper. Its liberating and helps me let go of the desire to control what happens on the page.
29513065_10211714842892377_3539996583204487168_o.jpg

You can still see my coffee cup (untouched) below in the bottom left corner. Before adding my yellow and orange I used some Vaseline on my page in a few areas to create some resistance and hopefully reveal some white paper.

29511231_10211714844132408_2671409541454757888_o.jpg

29512761_10211714847092482_3712629327628599296_o.jpg

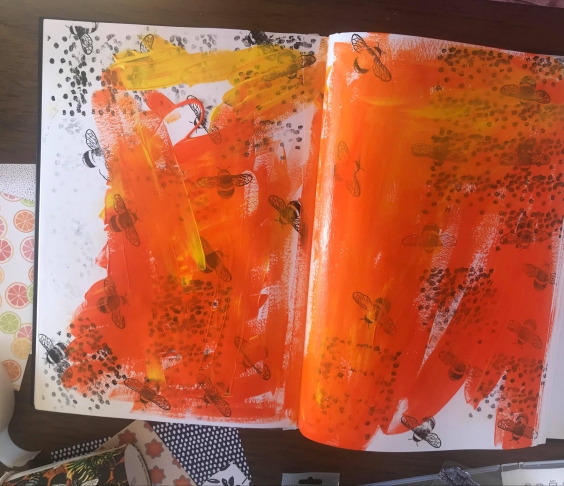
By this stage, the first layer was fairly dry (still a little tacky) and I then used a baby wipes to remove some of the paint and reveal the resisted parts of the page. I then added a dusty light blue. I was not happy at this point and feeling rather frustrated with this project.

29572959_10211714847652496_3881309748657651712_o

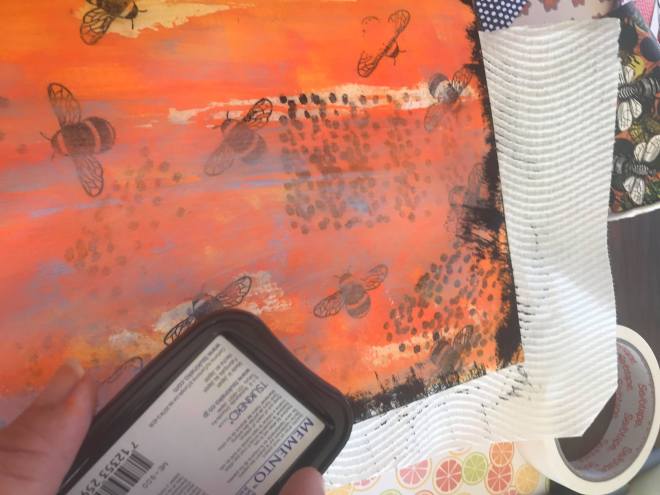
My work needed more depth so to create this I darken the edges tearing in some areas. I placed a paper towel behind my project to protect my other pages and my table. The ink was used directly from my ink pad.

Art journal 2:1

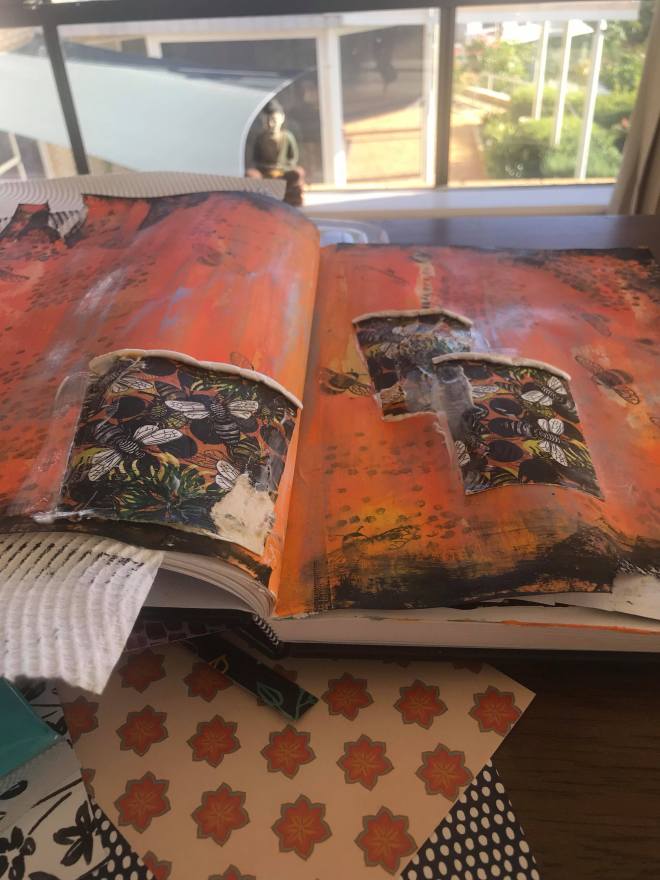
Next came the coffee cup and I cut it into three, I knew I wanted at least three cups on the paper. I used mat medium gel and liberally applied it to the cups both back and front. I knew by now this page needed to be lightened up so I got out my white gesso and using my fingers liberally spread white paint over my page. Also at this point, I added some lemons and oranges (designer paper) but later almost completed whited them out. They still peek through in the finished work.

29472779_10211705908389020_2487404831732400128_o

Now that was fun…I love touching all my art and applying paint with my fingers! Next came the words that came from a book I am reading. I photocopied the pages as its a book that I will probably reach for again and again. The book is called “Living with Joy” by Sanaya Roman. Well worth a read.

Art journal 2:quote

At this point I also placed some green and white dotted paper on my page to bring out some of the green on the cups, this paper brought a greater depth to my page. I then added more white, after this, I placed my quote and a section of the page of the book where the quote was taken from. I also put a strip of washi tape through the page.

It still needs something else and I added gold sparkles Gold Glitter Flakes from Stampin’ Up and they are truly gorgeous. I’m in love with these, so beautiful and really rather glamorous! I also had some leftover white embossed bumblebees from a previous card project and I decided that they would complete my project nicely.

Art journal 2-2

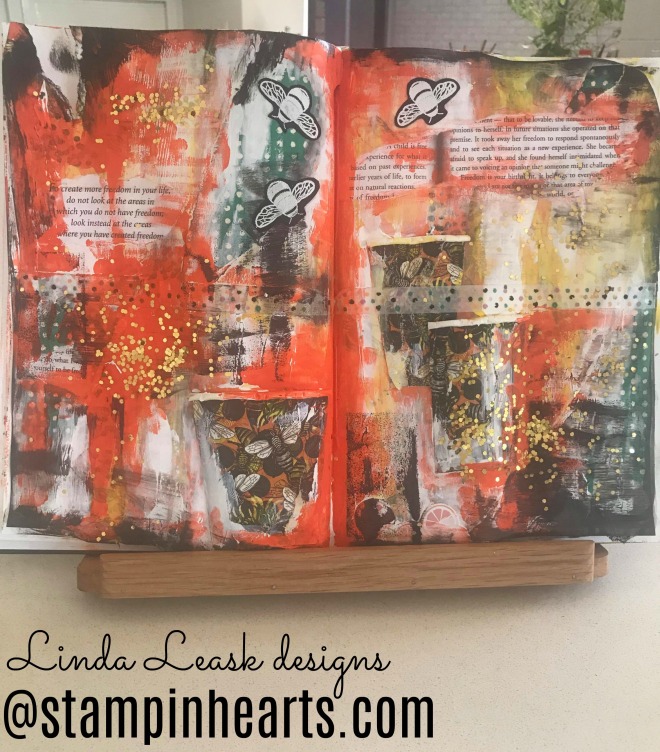
So here is my finished page, its rather sparkly in the sunlight and has many interesting nooks and crannies, it was a challenging project for me and I’m satisfied with the outcome but who knows it could change at any time, if I feel the need or maybe I’ll just move on to something else.

Happy art journalling

Linda xxx